Tip 9 : Aligning and Spacing in Rapidstudio
Hannes / 20 October 2010
How to Create a Collage of Photos in RapidStudio
Creating a photo collage as a page design can seem challenging, but with a little practice, you’ll master aligning and spacing images accurately in RapidStudio. This tutorial will guide you step-by-step on how to create a beautiful, well-aligned collage for your photobook.
Step 1: Start with the Top Row
Begin by arranging the top row of images. Drag the pictures horizontally next to each other to check if they fit within the “Safe Area.” If they extend beyond the safe area, you’ll need to resize them. Leave adequate space between the image frames and the safe area to avoid an untidy look.
Step 2: Uniform Image Width
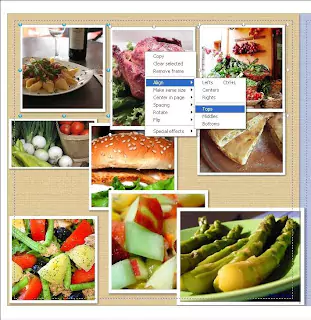
- Select all images in the top row by clicking the first image (master) and then holding
CTRLwhile clicking the others. The master image will have blue dots; the others will have white dots. - Right-click and choose Make Same Size > Width to match the widths of all selected images to the master.
- Drag the side of any selected image to adjust the width. All images in the selection will update automatically.
Step 3: Positioning and Spacing
- Place the leftmost and rightmost images of the row within the safe area to act as "posts."
- Select all images in the row, right-click, and choose Spacing > Make Horizontally Equal to distribute them evenly.
- Adjust the vertical position of one image to align with the safe area using the arrow keys.
- Select the row again, right-click, and choose Align > Tops to align all images vertically to the master’s position.
Step 4: Adjust the Left Column
- Select all images in the left column, making the top image the master.
- Right-click and choose Make Same Size > Both to ensure uniform image sizes in the column.
- Align the left edges by selecting the column, right-clicking, and choosing Align > Lefts.
- Adjust vertical spacing by setting the top and bottom “posts” and using Spacing > Make Vertically Equal.
Step 5: Final Adjustments
- Resize the remaining images on the page to match the established row and column dimensions.
- Align the bottoms of each row to the column and the left sides of each column to the row.
Final Result
Once you’ve completed these steps, your collage will be neatly aligned and ready to print!
For more design tips and to explore our photobook options, visit our Photo Book page or Contact Us for assistance.